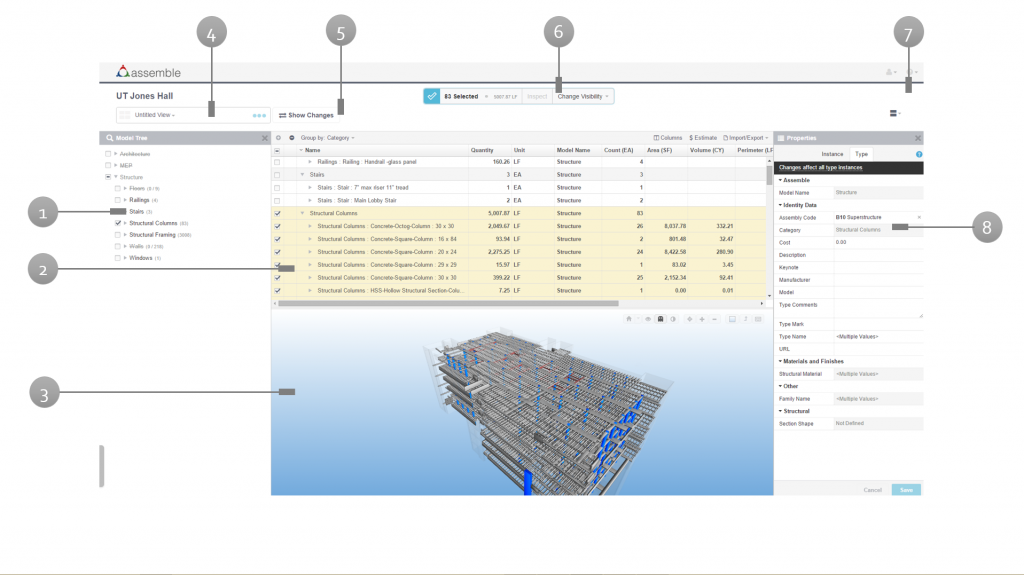
Review the diagram below to see how Assemble works and to get familiar with the names and areas of the user interface for the Assemble Add-in for Revit and the Assemble Insight web application. Assemble is designed to help you:
 Publish
Assemble automates the extraction of all model information so your team can quickly access and use BIM data for design, precon and construction activities to achieve greater delivery efficiencies. Start by installing the Assemble Add-in for Revit, AutoCad Architecture and Revit MEP to begin publishing information to the cloud in minutes. After logging into the Assemble Insight web application, any project stakeholder can immediately leverage the model information for unprecedented project insight.
 Manage
Assemble’s web-based platform provides a collaborative environment to access, customize, condition and manage design and construction model data sets throughout the project lifecycle. Use BIM data to manage a design model to cost, communicate value engineering strategies, analyze change between model versions, interrogate quantities, explore what-if scenarios to better understand costs throughout the design and construction process and more, using a light weight, simple to use interface.
 Share
Share
Assemble reduces project risk associated with traditional file-based project systems with easy version control and tracking. Everyone is able to access and work from the current model version. Publish the model to capture information at major milestones or weekly to track project trends. Export custom data sets to Microsoft Excel® for fast, reporting, conditioning, and analysis by all team members. Assemble makes model data accessible to all project stakeholders, regardless of their location.
What’s Inside Assemble?
See the features of Assemble’s cloud-based BIM model-data management solution. Just correspond the numbers to the details below the image.

Refer to each of the numbers above for a description of the software’s functionality.
1. Model Tree Panel – Navigation tree of all models, categories, families and types in the project
2. Inventory – Schedule of all visible objects in the view
3. Model Viewer – View and navigate model geometry
4. View Chooser – Use the dropdown to choose other views or click on squares icon to return to Project Inventory
5. Show Changes Button – Launch compare with the click of a button
6. Selection Bar – Change visibility of objects, launch the Properties Panel or review summary quantities
7. Help – Launch the Getting Started tutorial or other Assemble resources
8. Properties Panel – All properties associated with the item(s) selected
