After publishing your project to Assemble, the Project Inventory displays links to all project models and saved views. Default Model Views to make it easy to navigate directly to the contents of the most current version of a model at any time. Most Assemble customers start their work with a Model View and then create Saved Views particular to their workflow or based on the specific information they want to see every time they return to a project. Review section 06 Creating Views to learn about creating saved views.
Open a Model View
- Click on the Sample Project – COBie Office Project Card on the Assemble Project Dashboard.
- From the Project Inventory page, click on Office_Struct to view the structural model information for the most current view.
Note: Assemble hides the following Categories by default in each Model View: Detail Items, Furniture, Rooms and Spaces are not visible and will be ignored in rules, groups and columns unless they are turned on manually by the user in the Visibility Settings panel. To read more about the Visibility Setting panel, click here.
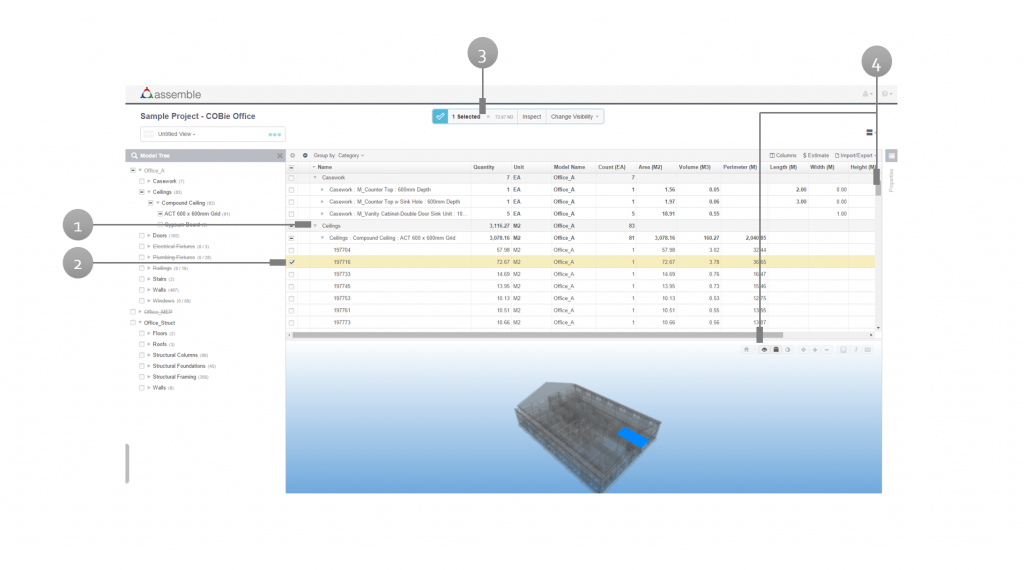
There are 4 components of the UI that are important for understanding the contents of a model: the Model Tree, Inventory, Model Viewer and the Properties Panel. Information in the Model Tree, Inventory, Viewer and Properties Panel are relational, so choosing an object from any one of these UI components automatically highlights and displays the same information in the other 3 components of the application.
The Model Tree
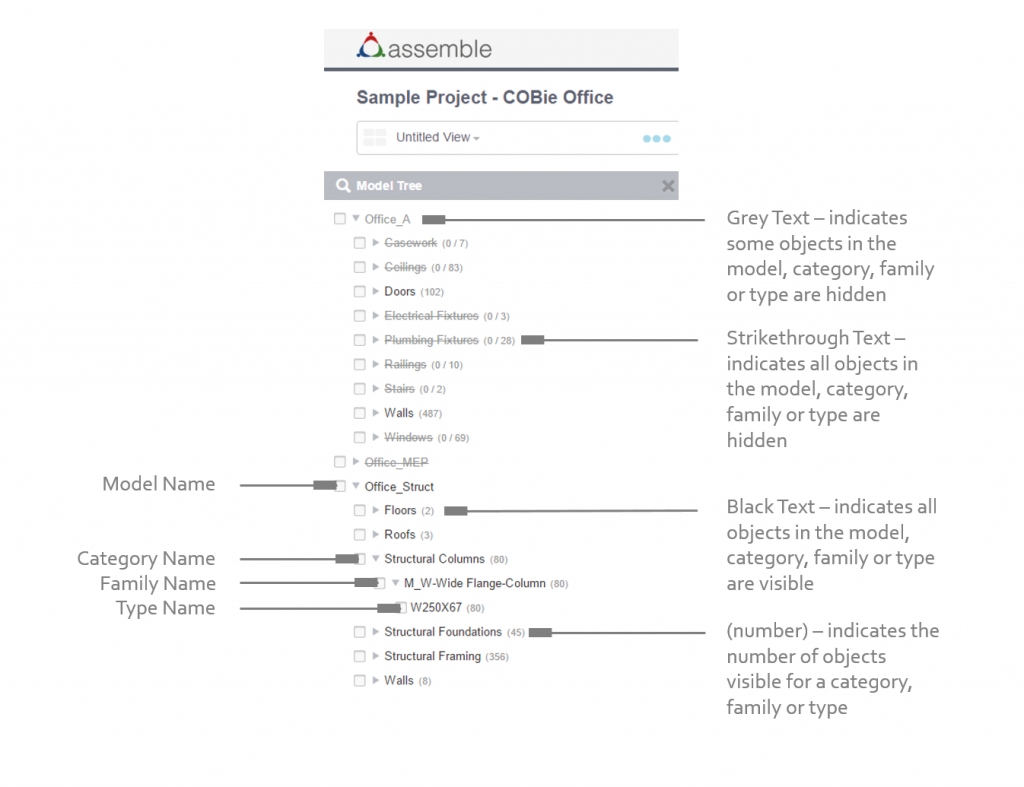
The Model Tree provides an easy way to navigate, select and change the visibility of models and their objects in a project with multiple models and various states of visibility. The Model Tree displays all models and objects visible in the Project, and more importantly, the models and objects that are not currently visible. Objects in the Model Tree are organized by Category Name, Family Name and Type Name. Instances are not displayed in the model tree, but can be selected from the Inventory or Viewer.
To Select Objects and Change Visibility using the Model Tree:
- Select an object or multiple objects from the Model Tree check boxes. Notice the Selection Bar appears with a quantity summary of the objects selected (or item count for multi-category selection) and your selection displays in both the Model Inventory (highlighted in yellow) and the Model Viewer (highlighted in blue).
- Click on Change Visibility in the Selection Bar.
- Choose either Hide Selection or Hide Others from the Selection Bar to take action on the items selected. Unhide Selection will only be active if the objects selected are currently hidden (indicated by a strikethrough).
NOTE: While your objects are selected in the model tree, choose Inspect from the Selection Bar to open the Properties Panel.
How to Read the Model Tree:
Model Tree is arranged by Models > Categories > Families > Types.
- Nodes with
Strikethroughtext have no visible objects displayed - Nodes with Grey text have at least an instance not visible
- Nodes with Black text have all objects visible
Only those objects visible are displayed in instance counts next to the category, family or type name (2/345).
The Inventory
The Inventory displays a schedule of the objects visible in the view and their associated properties. The properties that are displayed in the Model Inventory can be changed by the user. Each object type is displayed in a default unit of measure, also configurable by the user. Use the scroll bars to navigate up/down and side/side to view the entire schedule. The check box next to each element in the Inventory allows you to select items and see them in the Model Viewer.
To Select Objects using the Model Inventory:
The Inventory allows you to select objects at the instance level. Walk through the following steps to learn more about the Inventory.
- Click on the arrow next to the Category Name to expand the category to a list of Family:Type Names.
- Click on the arrow next to the Family Name to expand the family to a list of object instances.
- Click on the check box to select the object and view it in the viewer. Also note that in the Selection Bar, your selection is summarized and you can take action on the item.
- Use the scroll bars next to the Inventory to review the schedule of properties for the object.
Note: If multiple items are selected that have different units of measure, the Selection Bar will display the number of items selected instead of a quantity. For example, you cannot sum the SF of a ceiling with the LF of a wall, but you can count the total number of ceiling objects and wall objects combined in a total item count.
How to Read the Model Inventory:
When reviewing the Inventory of a model, you will notice that not every cell displays a value. Assemble typically displays values at the Instance level and occasionally when the sub-values for a row cannot be summed into a single representation. As a general rule, a quantity column should provide summed data, but this is not always possible. The Unit Cost, Total Cost, and Count values can always be summed and may therefore appear at row levels not typically populated with summed values.
The Model Viewer
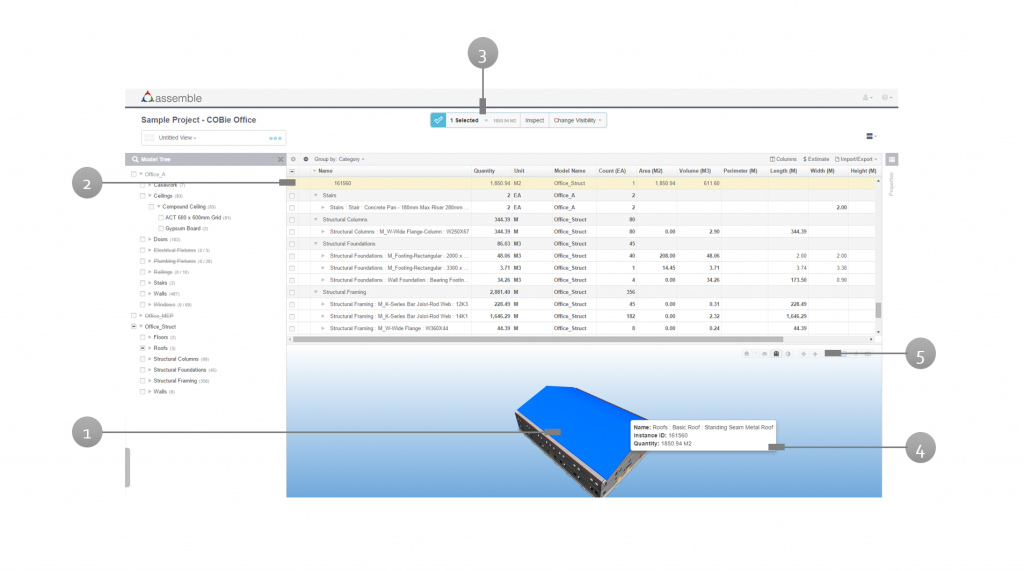
The Assemble Model Viewer offers visual verification of your model inventory. Use the Viewer tools to investigate and navigate your model. You will find a number of icons at the top-right of the model viewer that you can use to modify your view of the model geometry.
To Select Objects using the Model Viewer:
- Click on an object in the viewer to select it.
- Notice that in the Inventory and Model Tree the object is highlighted/checked.
- In the Selection Bar, your object is summarized in its default unit of measure.
- Hover over any object in the Viewer with your mouse, and a tooltip will display the Name in Category: Family: Type, the Instance ID and the Quantity.
- Hover over the icons in the upper-right corner of the viewer to adjust the zoom, display, background color, etc. To learn more about the Viewer tools and icons, click here.
Note: Hold down Ctrl on your keyboard and continue selecting objects in the Viewer, then you can use the Selection Bar to change the visibility of the entire selection set.
The Properties Panel
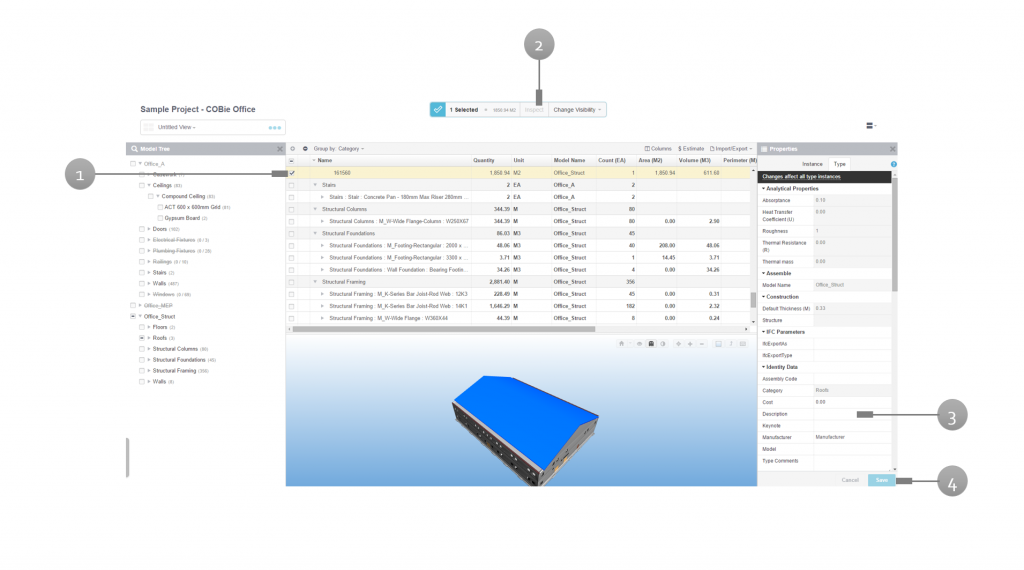
The Properties Panel provides detailed information about the objects in your model. There are two types of properties the panel displays for each object: instance properties and type properties. Any of these properties may be Read Only or Editable. All properties related to the geometry and its placement in the model is Read Only. Most other properties, if editable in the authoring tool are also editable in Assemble.
To View the Properties for an Object:
- Select an object(s) from the Model Tree, Model Inventory or Model Viewer.
- Click Inspect on the Selection Bar or click on Properties on the right sidebar.
- Click in any white box in the right column to edit the property. Read only properties are highlighted grey.
- Click Save.
Note: Changes may be made to multiple instances, types or categories at one time. Select all the instances, types or categories, edit the property and click Save.
Changing Model Versions
- Click the Version Number next to the name of the model in the Model Tree.
- Click on the dropdown next to the model you would like to change versions.
- Choose the version name.
- Click Done. Your selected model version is now loaded into the view.
Note: Versions do not save to a view but can be changed at anytime from within a particular Model or View.
Searching for Models
Use the Search Box to narrow the list of Views on the Project Inventory Page. Start typing the name of a View (or Model) to narrow the list of Views (and Models).
Modifying Model Settings
To edit the name of a model, or any model version, or to delete a model or any of its versions click the 3Dots menu on the Model Card.
Note: When you delete a model you will be prompted to verify that deleting a model will also delete all of it’s views.


